Phoenix
Bug-O-Rama Trip Report |
Me, the wife, and
the dog all made the trek to Phoenix for the April 10th Bug-O-Rama. I was
really looking forward to this event, as the last time I’d been out there to see some
PRA racing was many years ago. Back then, the R&R Machine pro-stocker was still
around, RLR debuted the first P/S Notch, and a few of the S/S race cars that I recall were
the Shawn McCarthy car, the Bugpack sedan, Andy Costello, Steve Timms, Gary Berg, and more
I forget. Even the Pro-Turbo class was bigger back then, including Dave Perkins in the
Dragonslayer car, Ron Townsend, Chris Bubetz, etc.
Back to the present day – this most
recent Bug-O-Rama had only 4 Pro-Stocks and 1 Pro-Turbo in attendance. Somewhat
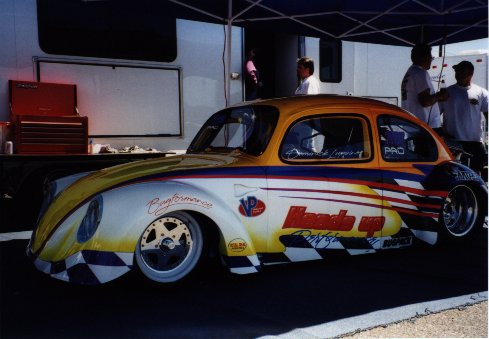
disappointing. You probably all know by now that the Heads-Up Performance car driven by
Dominic Lupino got out of shape and smacked the wall hard in a qualifying round. It stayed
upright, but the impact was pretty intense and it appeared to have broken both the front
and rear suspensions on the driver side of the car. What a gorgeous car that is. It looks
even better in person than in the magazine article I’ve studied so many hundreds of
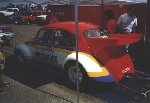
times. It made me sick to see it torn up like that. One other Pro-Stock car also got
intimate with the wall. In the finals, Rick Higa’s brand new (1st time
out) Pro-Stock Bug build by RLR and driven by RLR’s Steve Yoder also got squirrelly
at about � track, crossed the center line, hit the wall and rolled over on it’s
roof. Before it came to a stop, it righted itself, rolled again, and eventually landed on
all fours. Both drivers were unhurt in the two unfortunate events – a testament to
the safety built into the JCL and RLR chassis cars.
Super Street had a pretty
good turnout and managed a full field of 8 cars. Shawn Geers was the man of the day. His
car is another that is stunning in person. I saw at least 4 SS cars sporting the JCL roof
tunnels – that seems to be the trend. They apparently work well, as the two strongest
running cars of the day, Perkins and Geers, both had tunnels.
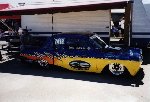
| Super Gas was once again dominated by
Randy Bowen. Their car sports a new paint job and a new JCL wing/engine cover. It’s
looking better than ever and running just as good as always. I hope to see them make it
down to TX for some of the TxPRA races now that we’re trying to get a S/G class up
and running. |
 |
Pro-Eliminator was won by,
who else, Muffler Mike Sheldon! I met Mike and his wife briefly in the pits. His car looks
great with its new paint job. He was running Jim Hagethorne’s turbo motor again, as
he had some minor difficulties with his alchy motor a week or so before the race. No
monster wheelies from Mike this time though – still getting the new tires broken in?
I also had the opportunity to meet John
Maher while walking through the pits. He was in from England for a bit of a vacation and
to catch some good racing. It was good to talk to him face-to-face. He’s working on
some very cool street cars over there. Check him out at www.JohnMaherRacing.co.uk.
Money was being collected at the event
for Dean Lowery, one of the founding fathers of VW high performance. Dean has been in the
hospital recently, going through some trying times. I believe about $2500 was collected
from various clubs, companies, and individuals, to give to Dean’s wife in order to
help them out during this difficult time. It’s good to see the VW racing community
come together to help one of their own.
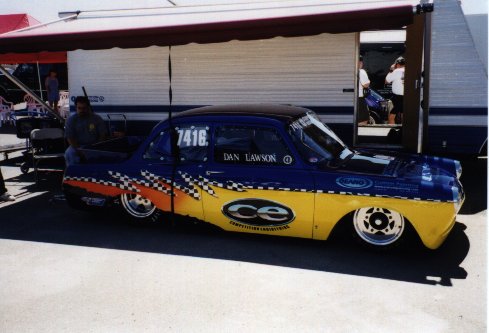
| A strong presence in some of the
eliminator classes were the Competition Engineering sponsored cars. They had a bad ass
looking Notchback that could have been a Pro-Stock. It had a perfect paint job on it from
Deano’s Custom Painting. |
 |
The manufacturers midway
was big, compared to what I’m used to at the TX Bug-In’s. I left with more
t-shirts than I needed, but that’s about all I bought. I never even made it to the
swap meet. We ran out of time looking at the race cars, show cars, and drag racing.
The drive out there and back was pretty
uneventful, just LONG, so I won’t bore you with that stuff. Looking forward to going
back. Perhaps I’ll be in a position to pull a car out there one day and participate,
rather than just be a spectator.
|
Big Wig Music
Selections of the Month |
Music
from 1999....
A critical item in the shop has to be the stereo.
If you’re like me, spending so much time in the shop you get tired of listening to
the same stuff on the radio all the time. So, I occasionally listen to CD’s while I
work, and here are my current favorites that you would find in the player if you came by
the BWRC shop:
Brian Setzer Orchestra – The Dirty Boogie – killer upbeat swing music that will get you
moving. Just don’t ding the car as you’re playing the air-guitar with a big
metal ruler.
Gipsy Kings –
The Best of the Gipsy Kings – I don’t understand a single word that comes out of
those guys mouths, but you can't help but try to sing along when you’re in the shop
by yourself. |
|
Tips and
Tricks for Making
Aluminum Panels |
The Basics – materials
Q: What type of aluminum should I use?
A: I prefer 6061-T4 aluminum in .032
thickness for interior panels. It doesn’t warp and get out of shape as badly as some
of the other grades when you start rolling the beads into it. For the rear wing and engine
cover, I use .050 thickness, primarily 5052 H32. The .050 works great as long as
you’ve got enough support from the box underneath or if you have tall wing
sides that attach to the body for support. If the box is shallow and the wing sides
don’t provide support, you may wish to use some .063 thick material, and may also go
to a stronger grade such as the 6061. The 5052 is what they gave me the first time I
started buying aluminum and didn’t know what to ask for, and it’s worked fine,
in most instances.
Q: How do I keep scratches and
fingerprints off the aluminum while I’m making my panels?
A: Buy your sheets with plastic on both
sides. It’s only about $5 more to have it applied. You can draw all over your panel
with markers where you want to cut or roll beads, and once the panel is finished, just
peel off the plastic and you’ve got perfect aluminum underneath.
Q: What do I use to make my
patterns?
A: I’m sure others with more
experience than me might have better ideas, and I’d love to hear them, but I have
always used posterboard for the interior stuff. It’s cheap, and since it’s thin,
you get nice precise edges when you cut it with scissors, unlike cardboard. If you need
something more sturdy in an area such as the wing or engine cover, that’s when the
cardboard comes in handy.
Another quick note, don’t try to make a complicated pattern from one piece
of posterboard. Many small pieces for different edges can be taped together to make one
pattern. See the photo below for a perfect example of this. It’s got tape all over it
and looks like total chaos, but the panel I cut from this pattern fit the first time with
almost no additional trimming. Sometimes I’ll just get pretty close with the pattern
and make notes on it with arrows and dimensions, like " 1/8 �
", if it’s slightly out of alignment or something. Then when I trace it onto the
aluminum, I just compensate where indicated by my notes.
Q: How do I fasten the panels to the car?
A: I use countersunk DZUS buttons,
springs, and tabs wherever possible. Tabs are available that can be welded onto your
chassis or cage or car body. If your panels are overlapping and just need to fasten to
each other, you can countersink the appropriate hole in the underlying panel and attach
the spring to that.
Try to think like a minimalist when it comes to DZUS buttons. The less you can
use and still get your panels to lay flat against each other, the better, in my opinion.
That’s where experience pays off, and I’ve still got a lot of room for
improvement there.
Pop rivets are another option, but they don’t look as professional as the
DZUS stuff. Sometimes they’re the best option for joining smaller panels to each
other when you can still DZUS the riveted assembly to the car and make it removable.
Rivets are also the best way to attach doorpanels and quarterpanels in my opinion, since
you’ll almost never need to remove those once they’re in.
Coming in future newsletters
– tools and techniques to help with cutting panels and rolling beads.
|
Cool Tool(s) of the
Month |
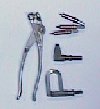
| Nearly all racecar supply shops sell
Clecos and the Cleco pliers. I bought all mine from Aircraft Spruce and Specialty company
(AS&S), as their prices are typically better than the race car shops and they will
give volume discounts if you buy enough. The pliers are around $8.00 and you can get 50
Clecos for $20 from AS&S. |
 |
Advanced: Kett K-200 Electric Shears - Shears aren’t really
what I’d consider advanced, but they are certainly more expensive than the set of
Clecos above. I have not tried any other brands, as I saw the Kett brand mentioned in Ron
Fournier’s book "Metal Fabricator’s Handbook", and searched for them
specifically. They work beautifully, particularly on the .032 interior panels. They go
through it like paper and leave a wonderful edge that needs no debur. They cut .050
aluminum also, however it does take noticeably more force to feed the shears along the
.050 material. I have not tried it on anything thicker than .050 |
| yet. The waste material from the cut is about a
3/16th inch curl. Either of the upper two jaws provides a perfect alignment
edge for whatever cut-mark you’re following on your panel. This is one of the tools I
can’t believe I ever got along without. Expect to pay $150 or more for the Kett
shears. |
 |
|
|
|